 Programming
02 Sep 2017

How to setup Umbraco models builder
They said when writing a blog always have an introduction but we are programmers. We don't have time to read intro, Go and proceed to the steps now.
UPDATE: for Visual Studio 2019 https://www.zpqrtbnk.net/posts/models-builder-extension/
Step 1 - Install Visual Studio Extension
- Download Visual Studio extension using this link.
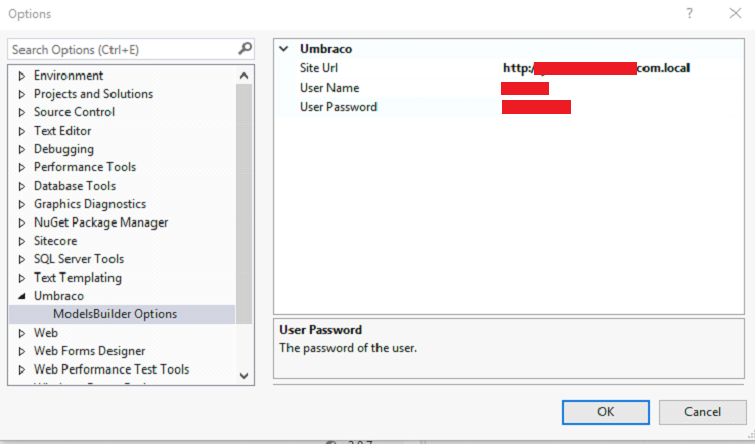
- After installation go to Tools>Options>Umbraco>ModelsBuilder Options and configure the url to your website (eg. http://www.example.com), username and password with an Umbraco user that has permission to the developer section.

Step 2 - Install Nuget packages
- Web Project
Umbraco.ModelsBuilder
Umbraco.ModelsBuilder.Api - Services Project (Project where you want to see your umbraco models)
Umbraco.ModelsBuilder
Step 3 - Add the following in your web.config appsettings
<add key="Umbraco.ModelsBuilder.Enable" value="true" />
<add key="Umbraco.ModelsBuilder.EnableApi" value="true" />
<add key="Umbraco.ModelsBuilder.ModelsMode" value="Nothing" />
Check Models Builder Dashboard in Umbraco

Step 4 - Create Models Builder directory
Project > UmbracoModels (Folder) > Builder.cs

Step 5 - Setup Models Builder Custom Tool
1. Right click Builder.cs
2. Add UmbracoModelsBuilder to the Custom tool the save
3. Right click "Run Custom Tool"

Done. This should generate your models under the Builder.cs
Here are other links for your reference.
- https://marketplace.visualstudio.com/items?itemName=ZpqrtBnk.UmbracoModelsBuilderCustomTool
- http://24days.in/umbraco-cms/2015/multilingual-vorto-nested-content/
- Sample Project: https://github.com/jbreuer/1-1-multilingual-example
